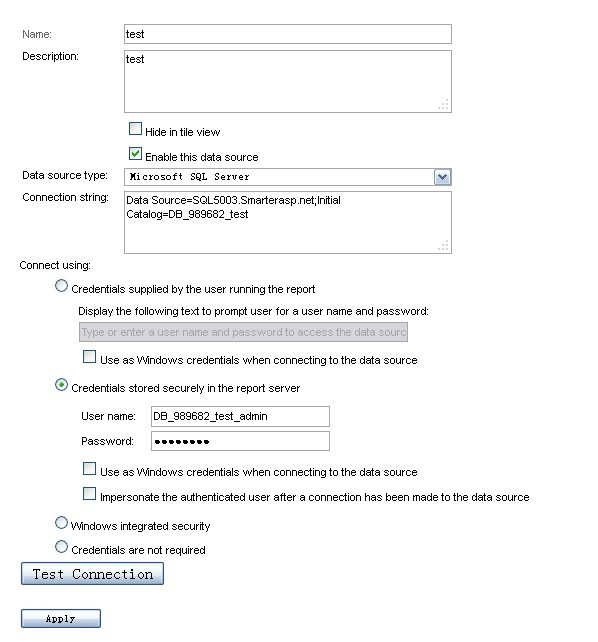
A data source specifies connection properties for a data source. If you have a data source that is used by a large number of reports, models, or data-driven subscriptions, consider creating a shared data source to eliminate the overhead of having to maintain the same connection information in multiple places.
To create a shared data source
-
Login to your hosting control panel-->Database manager-->Mssql manager-->MSSQL Reporting Serivce, enable the service, and use the service URL, username and password to login to your repoting service (SSRS)
-
In Report Manager, navigate to the contents page.
-
Click New data Source. The New data Source opens.
-
Type a name for the item. A name must contain at least one character and it must start with a letter. It can also include certain symbols, but not spaces or the characters ; ? : @ & = + , $ / * < > | " /.
-
Optionally type a description to provide users with information about the connection. This description will appear on the Contents manager in Report Manager.
-
In the Data source type list, specify the data processing extension that is used to process data from the data source.
-
For Connection string, specify the connection string that the report server uses to connect to the data source. It is recommended that you do not specify credentials in the connection string.
The following example illustrates a connection string for connecting to the local SQL Server AdventureWorks2012 database:
data source=<localservername>; initial catalog=AdventureWorks2012
-
For Connect using, specify how credentials are obtained when the report runs:
-
If you want to prompt the user for a logon name and password, click Credentials supplied by the user running the report. To use the credentials that the user enters as Windows credentials, click Use as Windows credentials when connecting to the data source. If the user name and password are database credentials, do not select this option.
-
If you intend to use the data source as a shared data source with saved credentials that are managed by the owner of the data source, or for reports that support subscriptions or other scheduled operations (such as automated report history generation), click Credentials stored securely in the report server . If the database server supports impersonation or delegation, you can select Impersonate the authenticated user after a connection has been made to the data source.
-
If you want the report server to pass the credentials of the user accessing the report to the server hosting the external data source, click Windows Integrated Security. In this case, the user is not prompted to type a user name or password.
-
If the data source does not use credentials (for example, if the data source is an XML file that is accessed from the file system), click Credentials are not required. You should only specify this credential type if it is valid for the data source. If you select this option for a data source that requires authentication, the connection will fail. If you select this option, be sure to configure the unattended execution account that allows the report server to connect to other computers to retrieve data or files when user credentials are not available.
For more information about configuring credentials, see Specify Credential and Connection Information for Report Data Sources. For more information about the unattended execution account, see Configure the Unattended Execution Account.
Note: You should just check the option "Credentials stored securely in the report server" with correct database credentials, do not check "Use as Windows credentials when connecting to the data source" and "Impersonate the authenticated user after a connection has been made to the data source"
-
No need to click 'Test connection' button or you will get error as below
The permissions granted to user 'username-001' are insufficient for performing this operation. (rsAccessDenied)
-
Click "Apply" button

Article ID: 428, Created: May 9, 2013 at 1:29 AM, Modified: November 29, 2024 at 3:28 AM