Remote Dictionary Server, commonly known as Redis, is a fast in-memory open-source database used as a key-value store in a highly scalable and performance-oriented system. Caching, high-speed transactions, real-time analytics, live notifications, machine learning, searching, and queue/ job processing are some of Redis' use cases. Because Redis is an in-memory key-value store, its efficiency makes it appropriate for data caching in your application.
Caching is the temporary caching of data in a high-speed storage layer (for example, computer RAM) to offer data faster when clients make the same future requests. This improves the re-use of previously computed data rather than retrieving it from the disk each time.
Using Redis as a cache when working with PHP and MySQL enhances application performance since Redis saves data in RAM several times faster than a hard disk (HDD) or solid-state drive (SSD). Caching also lowers database costs (the number of round trips to the backend database) and keeps the backend from becoming overloaded.
Data caching is an essential design component when creating online applications with more reads than writes. Blogs, online commerce, and social media sites are such applications.
In this article, you will see how to use Redis with PHP to cache MySQL data on Ubuntu 20.04.
Prerequisites
To complete this tutorial, you will need the following -
An Ubuntu 20.04 server with a non-root user with sudo privileges.
Set this up following the "Initial Server Setup with the Ubuntu 20.04" guide.
A LAMP stack.
Follow the "How To Install Linux, Apache, MySQL, PHP (LAMP) stack on Ubuntu 20.04" tutorial.
Set up a Redis Server following the "How To Install and Secure Redis on Ubuntu 20.04" tutorial.
Step 1 - Installing the Redis Library for PHP.
To begin, install the php-redis extension; it will allow you to communicate with Redis using PHP. To update your server and install the extension, run the following commands -
$ sudo apt update
$ sudo apt install php-redis
To load the extension, confirm the installation and restart the Apache web server -
$ sudo systemctl restart apache2
After you have installed your dependencies, you will create your database.
Step 2 - Setting up a Test Database, Table, and Sample Data.
In this stage, you will establish a MySQL database to permanently save data on disk. You will also construct several tables and a user account with complete database access.
To begin, log in as the root user of your MySQL server -
Enter the root password for the MySQL server you configured in the LAMP requirement. Then press ENTER to proceed.
Next, use the following command to create a test_stock database -
mysql> CREATE database test_stock;
Output -
Query OK, 1 row affected (0.11 sec)
Next, create a user for your database.
In this example, we will refer to this user as test_user. Also, replace PASSWORD with a strong password -
mysql> CREATE USER 'test_user'@'localhost' IDENTIFIED WITH mysql_native_password BY 'PASSWORD';
Then provide test_user full access to the test_stock database by doing the following -
mysql> GRANT ALL PRIVILEGES ON test_stock.* TO 'test_user'@'localhost';
Finally, run the following command in MySQL to reload the grant tables -
Output -
Query OK, 0 rows affected (0.01 sec)
End the MySQL root session -
Output -
Bye
Return to the MySQL server using the credentials for the newly formed test_user -
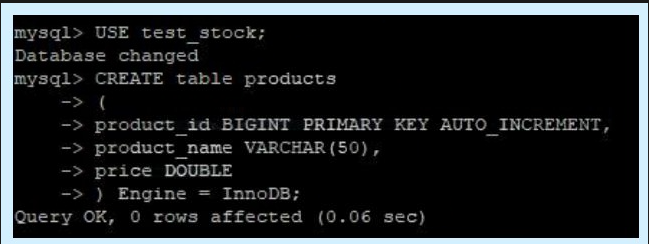
To proceed, enter the password for the test_user. When you get to the mysql> prompt, switch to the test_stock database -
Output -
Database Changed.
You will then make a product table with three columns. The product_id field will be used to uniquely identify each product.
The AUTO_INCREMENT keyword will be used to prevent manually allocating the IDs.
The real names of your items will be stored in the product_name column. A VARCHAR data type with a length of 50 characters will suffice in this scenario. The price is in the last column of the products table; you will use the DOUBLE data type to accommodate prices with decimals (for example, 16.33).
Run the following command to construct the products table -
CREATE table products
(
product_id BIGINT PRIMARY KEY AUTO_INCREMENT,
product_name VARCHAR(50),
price DOUBLE
) Engine = InnoDB;
Output -
You will now populate the products table with some records (for testing purposes).
You don't need to manually insert data into the product_id column because the AUTO_INCREMENT column will do it for you. Execute the following commands in this order -
mysql> INSERT INTO products(product_name, price) VALUES ('VPS', '50.00');
mysql> INSERT INTO products(product_name, price) VALUES ('Dedicated Server', '100.00');
mysql> INSERT INTO products(product_name, price) VALUES ('Shared Server', '20.00');
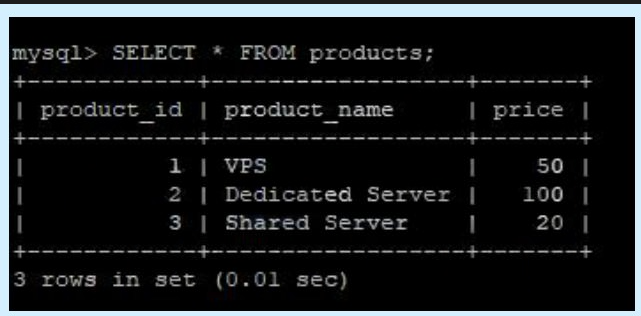
Make sure you get the following output after running each command -
mysql> SELECT * FROM products;
Output:
End the test_user's MySQL session -
Output:
Bye
After creating the test_stock database, products table, and test_user, you will write a PHP script that retrieves data from the MySQL database and caches it in Redis.
Step 3 - Create a PHP Script to Fetch and Cache MySQL Data
In this step, you will write a PHP script to retrieve the example data from the previous stage.
When you first execute the script, it will read the data from MySQL (that is, from disk) and cache it in Redis. As a result, subsequent reads of the products' data will come from Redis (i.e., system RAM). Because system memory is many times faster than even the fastest solid-state drive, data will be retrieved from the Redis cache rather than the system disk.
Create a products.php file in your website's root directory -
To begin, provide the following information to connect to Redis and create an instance, which will be saved as an object in the $redis variable.
$ sudo nano /var/www/html/products.php
You can reach the local host using the address 127.0.0.1. You can adjust this value if you are running Redis from a remote server.
Replace REDIS_PASSWORD with the Redis password specified in the /etc/redis/redis.conf configuration file.
<?php
$redis = new Redis();
$redis->connect('127.0.0.1', 6379);
$redis->auth('REDIS_PASSWORD');
$key = 'TESTKEY';
if (!$redis->get($key)) {
$source = 'MySQL Server';
$database_name = 'test_stock';
$database_user = 'test_user';
$database_password = 'PASSWORD';
$mysql_host = 'localhost';
$pdo = new PDO('mysql:host=' . $mysql_host . '; dbname=' . $database_name, $database_user, $database_password);
$pdo->setAttribute(PDO::ATTR_ERRMODE, PDO::ERRMODE_EXCEPTION);
$sql = "SELECT * FROM products";
$stmt = $pdo->prepare($sql);
$stmt->execute();
while ($row = $stmt->fetch(PDO::FETCH_ASSOC)) {
$products[] = $row;
}
$redis->set($key, serialize($products));
$redis->expire($key, 10);
} else {
$source = 'Redis Server';
$products = unserialize($redis->get($key));
}
echo $source . ': <br>';
print_r($products);
Save and exit the file.
You've now configured a PHP script to connect to MySQL and cache data in Redis. In the following stage, you will put your script to the test.
Step 4 - Testing the PHP Script.
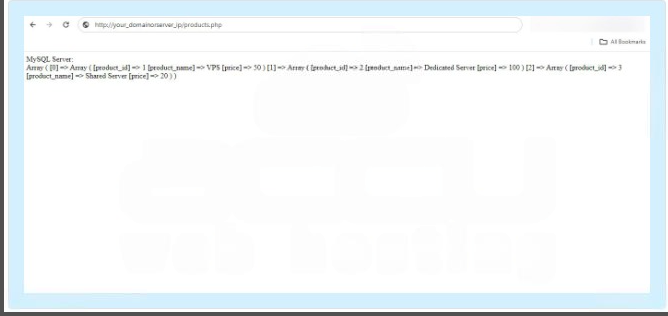
To see if Redis is caching data from the MySQL database, open a browser window and enter the path to the PHP script. Remember to replace your_server_IP with your server's public IP address, as in: http://your_server_IP/products.php.
When you initially execute the script, you will see the following output, which displays data from the MySQL database because the PHP script has not yet cached any data in Redis:
MySQL Server
Array ( [0] => Array ( [product_id] => 1 [product_name] => VPS [price] => 50 ) [1] => Array ( [product_id] => 2 [product_name] => Dedicated Server [price] => 100 ) [2] => Array ( [product_id] => 3 [product_name] => Shared Server [price] => 20 ) )
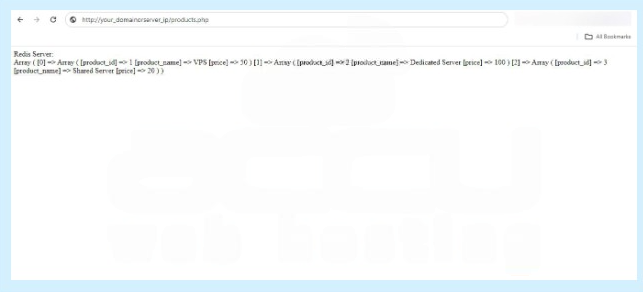
When you run the script again, you will see that it is reading data from Redis, acting as a cache for MySQL.
Redis Server
Array ( [0] => Array ( [product_id] => 1 [product_name] => VPS [price] => 50 ) [1] => Array ( [product_id] => 2 [product_name] => Dedicated Server [price] => 100 ) [2] => Array ( [product_id] => 3 [product_name] => Shared Server [price] => 20 ) )
Conclusion
In this guide, you have used Redis to cache MySQL data with PHP on Ubuntu 20.04.